Gone are the days when your family had piles of photo albums and shoeboxes of unorganized stacks of Polaroids and Kodak negatives. iPhoto has replaced those somewhat nostalgic collections and turned memories into binary. I’ve found that over the years my iPhoto Library has grown to a size that’s become rather unmanageable. When terabyte disks aren’t hard to come by, 20GB for my iPhoto library isn’t unreasonable but I’ve found as we’re transitioning into the post-PC era of things like Photo Stream and limited capacity flash drive devices, it’s just not necessary.
When I got my first decent point-and-shoot camera in high-school I cranked up the resolution as high as I could just in case I wanted a 12” x 18” print of that silly photo of my girlfriend and me overtop of my parents mantel. Now I’m less concerned about that and more concerned about fitting my memories on all my devices so I have them everywhere, like the classic wallet photo.
Before I go any further, if you plan on playing around with your iPhoto library think about how important those images are to you. You’ll want to backup your library before doing anything with it. I have 4 backups before doing this — TimeMachine, a Carbon Copy, and external drive, and a local copy — and I was still nervous. I don’t want you to lose precious photos.
Having thousands of photos at 3072 × 2304 pixels didn’t make sense anymore especially with limited drive space my new MacBook Air. I wanted to resize those images to something still reasonable but save a few gigs while I was at it. I went straight to Automator, an under-praised utility in Mac OSX, and started playing around. Here’s what I came out with.
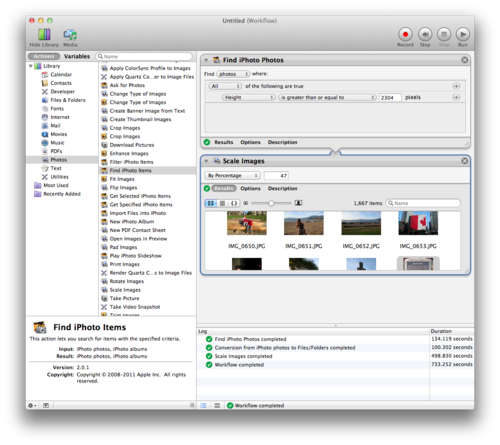
Step 1. Find iPhoto Photos
Step 2. Scale Images
That easy.1
There are two variables here that are really up to you. The first is the search query to find the images you want to resize. For me, many of my shots were 3072 × 2304 (or similar resolution in portrait) so I went with “Height is equal to or greater than 2304px”. This would include all shots at this resolution whether in portrait or landscape. The other variable is the outputted size you would like. I chose to to fit the images within 1080px wide as the largest I plan to display my images is likely on an HDTV which are generally at 1080p. 2 I played around with a few images in Preview first and resized them to see what worked. For me, it was just under 47% of the original.
After a few small tests I lined up Automator to search through my iPhoto Library and handle any over-sized images. I clicked run and in about 10 minutes it had done the job trimming about 7GB from my Library.
One other thing I noticed while snooping around my iPhoto Library (in ~/Photos, cmd-click on iPhoto Library and click “Show Package Contents) that the iPod Photo Cache folder had grown to a couple gigs over syncing a bunch of different iPods, iPhones, and iPads. You can delete that folder, and the next time you sync photos on your device it will rebuild that cache only with the image crops you need.
After that, my iPhoto Library was about half its size. I can probably get some more out of by resizing some of the images coming from other cameras that had a slightly lower resolution than I made my Automator action fit.
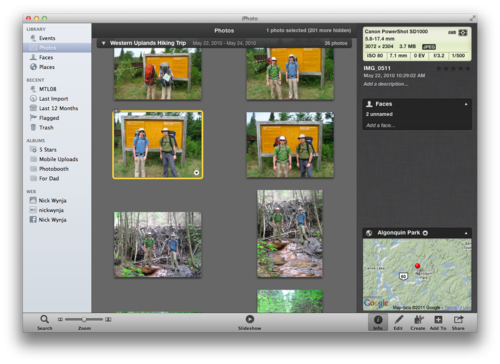
One issue that I’m seeing after the resize is that iPhoto is still reporting the original resolution when I Get Info on it. I’m assuming this is in the EXIF data of the shot and not the outputted image, but just to see what would happen I rebuilt the Library by holding the Command and Option keys when opening iPhoto and chose the options I thought fit.
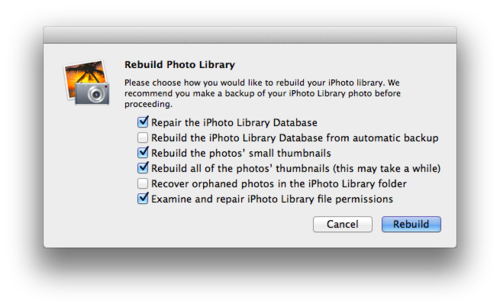
This didn’t help, but if you can think of something that may please let me know.
I managed to drop almost 10GB (that’s half!) of my iPhoto library without deleting anything important or losing image quality. Your milage may vary depending on how large of image resolution you have and how much you are willing to cut. Now I have a much more manageable sized library for backing up on-site and off-site (like Dropbox) and have more reasonable sizes to keep on my devices.
I thought about attaching the workflow that you could just download, but I encourage you to open up Automator and play around with it. It’s powerful and the more you get familiar with it, the more you’ll find use for it. If you’re really stuck find me on twitter. ↩︎
I’ll probably be kicking myself when that rumored Retina Display iPad comes out, but that’s what backups are for. ↩︎